OpenDisplay on NM-EPD-420-4C (with Home Assistant Integration)
Run the OpenDisplay firmware on the NM-EPD-420-4C four-color e-paper board — configure and upload images over BLE, and control it from Home Assistant.
Overview
OpenDisplay is an open-source, BLE-first e-paper ecosystem: a phone, computer, or Home Assistant host connects directly to the display — no dedicated 802.15.4 access point required. The firmware, browser tooling, and Home Assistant integration are all open source.
RockBase IoT has ported OpenDisplay to the NM-EPD-420-4C (ESP32-S3 + 4.2" four-color B/W/R/Y e-paper, 400×300). The port lives on the nm-epd-420 branch of RockBase-iot/OpenDisplay-Firmware, using the EP42YR_400x300 panel class (Good Display 4.2" four-color family: GDEY0420F51 / GDEM042F52).
This guide covers installing the OpenDisplay firmware on the NM-EPD-420-4C, configuring it and uploading images over BLE, and controlling it through the Home Assistant integration.
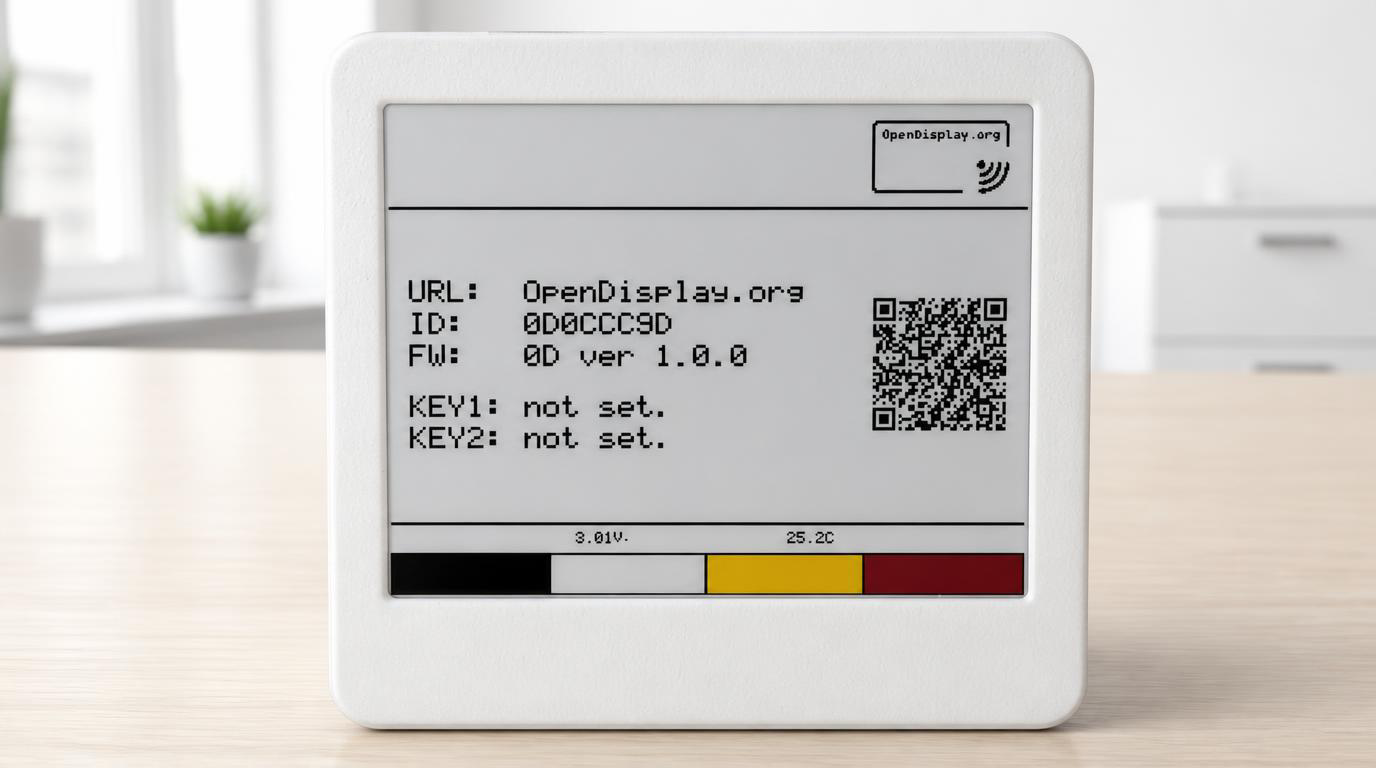
Verified on NM-EPD-420-4C hardware: full-screen refresh, physical buttons, deep-sleep wake via the BOOT key, battery reporting, and AHT20 temperature/humidity reporting.
Known limitations:
- The four-color panel does not support partial refresh; every full refresh takes about 25–30 seconds
- The on-board AHT20 temperature/humidity data is sampled and advertised by the firmware, but temperature/humidity entities will only appear in Home Assistant after the host side (the Home Assistant integration) adds support for the AHT20 sensor type (type 7)
- Red/yellow color packing order and the battery voltage scaling factor are still under hardware verification — if you see red and yellow swapped, or inaccurate battery readings, please check the repository issues first
Why OpenDisplay
- BLE-first workflow: configure the device and upload images without any dedicated gateway
- Browser-based tooling: install, configure, and upload from a browser with Web Bluetooth support (Chrome / Edge)
- Home Assistant integration: devices are discovered and added to Home Assistant, with automations for scheduled screen updates
- Low-power design: deep sleep with timer/button wake-up, ideal for battery-powered always-on displays
Prerequisites
- NM-EPD-420-4C board (ESP32-S3, 16 MB Flash + 8 MB PSRAM, buy here: rockbase.shop)
- USB-C cable (for flashing the firmware)
- A browser with Web Bluetooth support (Chrome / Edge) for BLE configuration and image upload
- Optional: Home Assistant 2026.7.0 or newer + a Bluetooth adapter (or an ESPHome Bluetooth Proxy)
Step 1: Install the Firmware
Option 1: RockBase IoT Web Flasher (recommended)
On the RockBase IoT Web Flasher page, select the project OpenDisplay and the device NM-EPD-420-4C, then connect and download to flash the firmware in one click.
Option 2: Flash the combined image
The repository provides a combined image bin/NM-EPD-420-4C_factory_full.bin (bootloader + partition table + factory config). Flash it at offset 0x0 with esptool:
esptool.py --chip esp32s3 -p COMx -b 460800 write_flash 0x0 NM-EPD-420-4C_factory_full.bin
The image only provisions its embedded factory config when the device has no stored configuration. If the board already holds an older config, push the current one over BLE (see the CLI method in Step 2).
Option 3: Build from source with PlatformIO
The NM-EPD-420-4C reuses the existing esp32-s3-N16R8 build environment (there is no dedicated board env — all device-specific settings live in the runtime config packet):
git clone https://github.com/RockBase-iot/OpenDisplay-Firmware.git
cd OpenDisplay-Firmware
git checkout nm-epd-420
pio run -e esp32-s3-N16R8 -t upload
This environment builds with Wi-Fi (LAN transport) enabled. To deliver images over both BLE and Wi-Fi, set communication_modes to 0x5 (BLE | WiFi) in the device config.
Installing the OpenDisplay firmware replaces whatever is currently running on the device (e.g., the factory test firmware). To restore it, reflash the factory firmware as described in the NM-EPD-420 Quick Start.
Step 2: Configure the Device over BLE
Browser method
- Open the OpenDisplay config tool (the official tool does not offer an NM-EPD-420-4C preset yet): opendisplay.org/firmware/config
- Click Configure over Bluetooth and select your NM-EPD-420-4C in the BLE pairing dialog
- Wait for the tool to write the config, then confirm the screen refreshes or shows the OpenDisplay boot image
The NM-EPD-420-4C Toolbox preset (nm-epd-420-4c) has been submitted for merging into opendisplay.org. If the preset is not available in the browser tool yet, use the CLI method below to write the config.
CLI method (od-device-cli)
Use the od-device-cli.py tool bundled with the repository to write the board config to a running device over BLE:
uv run tools/od-device-cli.py write-config --addr AA:BB:CC:DD:EE:FF \
    --input devices/nm-epd-420-4c.yaml
Replace AA:BB:CC:DD:EE:FF with the device's Bluetooth MAC address. The devices/nm-epd-420-4c.yaml file already contains the complete panel, pin, power, and button configuration and normally needs no changes.
Step 3: Upload an Image
- Open the OpenDisplay display tool: opendisplay.org/firmware/display
- Click Connect and select the device in the BLE pairing dialog
- Click Select Image and choose a local image file
- Click Upload Image — the screen refreshes once the transfer completes
For the sharpest result, use images that match the panel's native 400×300 resolution. Each full refresh of the four-color panel takes about 25–30 seconds — please wait for it to finish.
Home Assistant Integration
OpenDisplay provides an official Home Assistant integration (OpenDisplay/Home_Assistant_Integration) that talks to devices over BLE. When the device has Wi-Fi enabled and has recently announced itself via mDNS, images are delivered over the LAN instead.
Requirements
- Home Assistant 2026.7.0 or newer
- A working Bluetooth setup with active BLE connections:
- a Home Assistant host with supported Bluetooth hardware, or
- an ESPHome Bluetooth Proxy (
bluetooth_proxywithactive: true)
- A powered NM-EPD-420-4C within Bluetooth range
Shelly Bluetooth proxies work well for passive BLE sensors, but OpenDisplay image uploads require active BLE connections. Use a Home Assistant Bluetooth adapter or an ESPHome Bluetooth Proxy for this workflow.
Install the Integration
Option 1: HACS (recommended)

Option 2: Manual
- Download the
opendisplayfolder from the latest release. If you need the AHT20 temperature/humidity sensor, use the RockBase IoT source files instead, or copycustom_components/opendisplay/sensor.pyover the officialsensor.py - Copy it into your Home Assistant
custom_componentsdirectory - Restart Home Assistant
Add the Device
- In Home Assistant, go to Settings > Devices & services
- Once the device is in Bluetooth range it is discovered automatically — click Add on the OpenDisplay card; if it is not discovered, click Add Integration and search for OpenDisplay
- If the device has encryption enabled, enter its 32-character key when prompted
- Assign a device name and area
What the Integration Provides
| Type | Content |
|---|---|
| Display content | An image entity showing the last frame sent; for a sleeping tag it shows the queued frame and marks it as pending |
| Sensors | Battery level and voltage, signal strength, last seen; temperature/humidity entities pending AHT20 host-side support (see the note at the top) |
| Buttons | Event entities for the physical USER / BOOT buttons |
| Firmware | An update entity that flashes new firmware over Bluetooth |
| Status | Whether content is waiting to be delivered, and whether Wi-Fi delivery is in use |
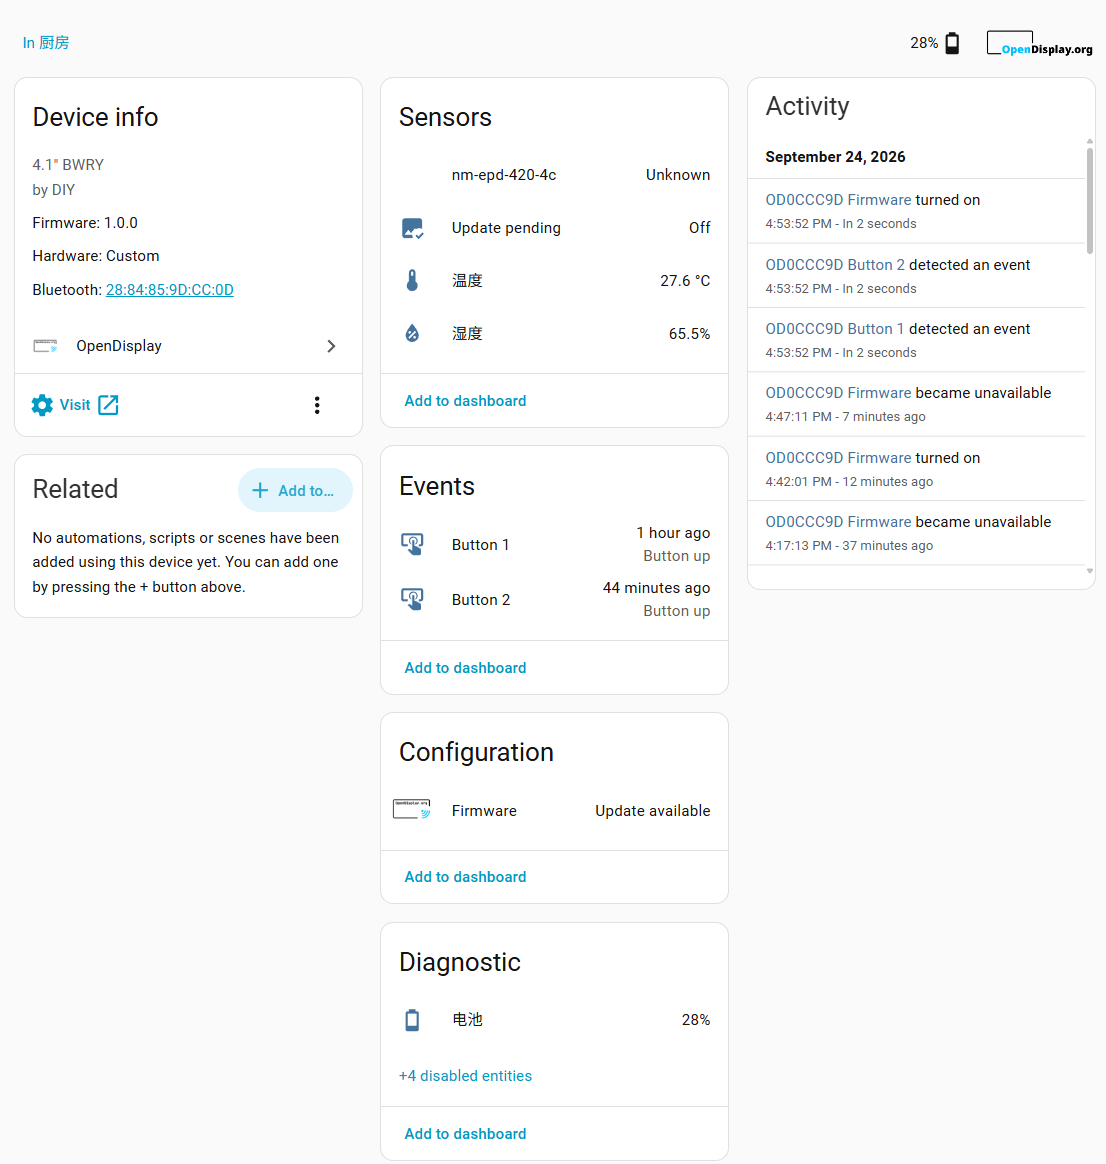
Battery-powered tags are handled properly. A deep-sleeping tag is dark most of the time, so content sent to it is queued and delivered the next time it wakes, rather than failing. On the NM-EPD-420-4C, the device enters deep sleep after 40 seconds of inactivity, wakes on a 1800-second timer as a fallback, and can also be woken immediately with the BOOT key.
Upload an Image from Home Assistant
Method 1:
On your Home Assistant page (e.g. homeassistant:8123), go to Settings > Developer Tools > Actions > Upload image, select the device, and upload an image.
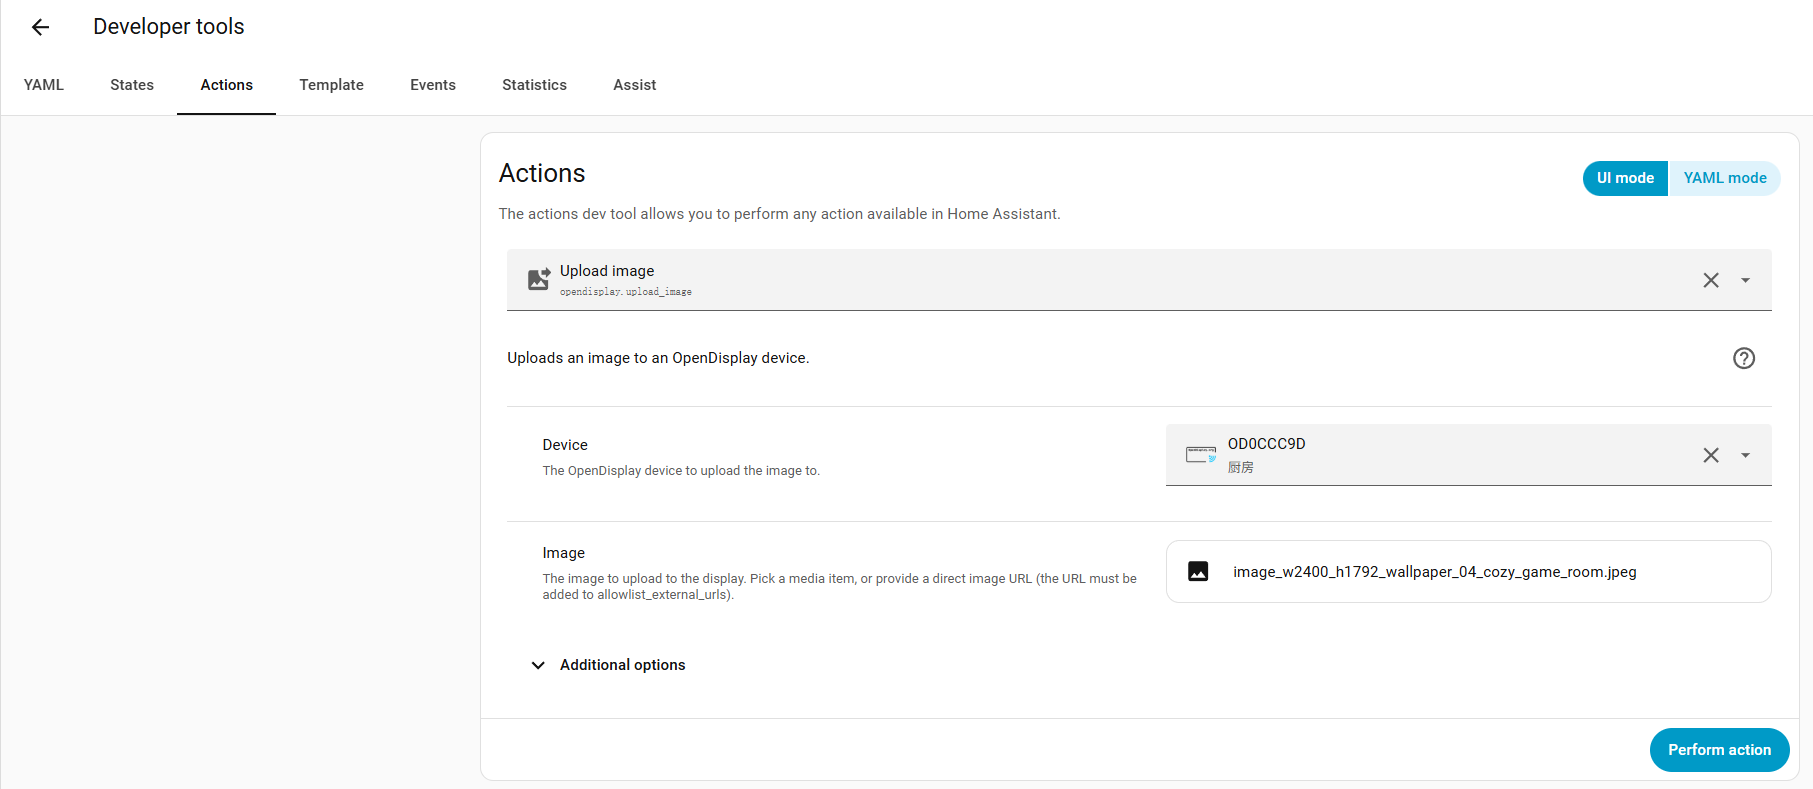
The upload image action also offers several image-processing options to fit your needs, such as:
- Rotation (0 / 90 / 180 / 270)
- Dither mode (None / Burkes / Floyd-Steinberg / Ordered / Atkinson / Stucki / Sierra / Sierra Lite / Jarvis, Judice & Ninke / dizzy)
- Refresh mode (Full / Fast / Partial)
- Fit mode (Stretch / Contain / Cover / Crop)
Method 2:
Store the image in Home Assistant's local media folder, then call the opendisplay.upload_image action:
action: opendisplay.upload_image
data:
  device_id: "your_device_id"
  image:
    media_content_id: "media-source://media_source/local/photo.png"
    media_content_type: "image/png"
Combine it with a time trigger for scheduled daily updates:
triggers:
  - trigger: time
    at: "08:00:00"
actions:
  - action: opendisplay.upload_image
    data:
      device_id: "your_device_id"
      image:
        media_content_id: "media-source://media_source/local/daily.png"
        media_content_type: "image/png"
Custom Drawing (drawcustom)
The drawcustom action composes a frame from text, shapes, icons, QR codes, images, plots, and progress bars — with template rendering for live states:
action: opendisplay.drawcustom
target:
  device_id: "your_device_id"
data:
  payload:
    - type: text
      value: "Temperature: {{ states('sensor.temperature') }}°C"
      x: 10
      y: 10
      size: 24
    - type: progress_bar
      x_start: 10
      y_start: 50
      x_end: 180
      y_end: 70
      progress: "{{ states('sensor.battery') | int }}"
      show_percentage: true
    - type: icon
      value: mdi:battery-70
      x: 190
      y: 60
      size: 24
drawcustom takes a target, so one call can draw to several devices, or to a whole area or label. Every element type and field is documented in the integration's drawcustom guide.
Device Configuration Reference
Key points of the NM-EPD-420-4C OpenDisplay board config (devices/nm-epd-420-4c.yaml), for advanced users:
| Item | Configuration |
|---|---|
| Build environment | esp32-s3-N16R8 (ESP32-S3, 16 MB QIO Flash + 8 MB OPI PSRAM) |
| Panel | EP42YR_400x300 (panel_ic_type: 58), 400×300, four-color B/W/R/Y (2 bpp), no partial refresh |
| EPD pins | SCK=IO2, MOSI=IO1, CS=IO46, DC=IO4, RST=IO5, BUSY=IO6 |
| Buttons | USER=IO45 (active LOW), BOOT=IO0 (active LOW, also the deep-sleep wake source) |
| Battery | ADC=IO3 (1:2 divider, enable pin IO43), 600 mAh, deep sleep after 40 s idle, 1800 s timer wake |
| Sensor | AHT20 temperature/humidity (I²C: SCL=IO38, SDA=IO39, address 0x38), sampled once at wake then powered down |
| Transport | BLE by default (communication_modes: 0x1); set 0x5 to enable BLE + Wi-Fi |
The three NM-EPD-420 panel variants (tri-color / B/W / four-color) share the same PCB and pin map; only panel_ic_type, color_scheme, and the full-refresh parameters differ in the OpenDisplay config. This port currently targets only the four-color NM-EPD-420-4C.
Troubleshooting
- Red and yellow appear swapped: the 2 bpp color packing order for the four-color panel is still under hardware verification — check the repository for the latest status
- Every refresh times out: suspect the BUSY polarity configuration first; open an issue with the serial log attached
- BOOT button oddities: IO0 is also the ESP32-S3 ROM download strap — keep the BOOT key released during reset or power-on unless you intentionally want the download mode
- No temperature/humidity entities in Home Assistant: a known limitation until the HA integration adds support for AHT20 (SensorType 7) — or use the RockBase-iot source files to replace the official
sensor.py
Resources
- RockBase-iot/OpenDisplay-Firmware (
nm-epd-420branch, includes the NM-EPD-420-4C port) - OpenDisplay website & browser tools
- OpenDisplay Home Assistant Integration
- OpenDisplay Discord community
- NM-EPD-420 product page | NM-EPD-420 Port Ecosystem